Server Actions 구현 시작에 앞서
[Next.js] Server Actions란?
Next.js의 Server Actions 란? 서버 및 클라이언트 컴포넌트에서 호출될 수 있으며 폼 제출 및 데이터 변경을 위해서버에서 실행되는 비동기 함수입니다. 조금 더 쉽게 풀어쓰자면 API 엔드포인트를
unhandled.tistory.com
⬆️ 이전 게시글을 먼저 읽어주세요 ⬆️
Server Actions 구현하기
전 MySQL을 활용하겠습니다.
다른 데이터베이스(MongoDB 등)와도 Next.js의 ServerActions를 사용할 수 있습니다.
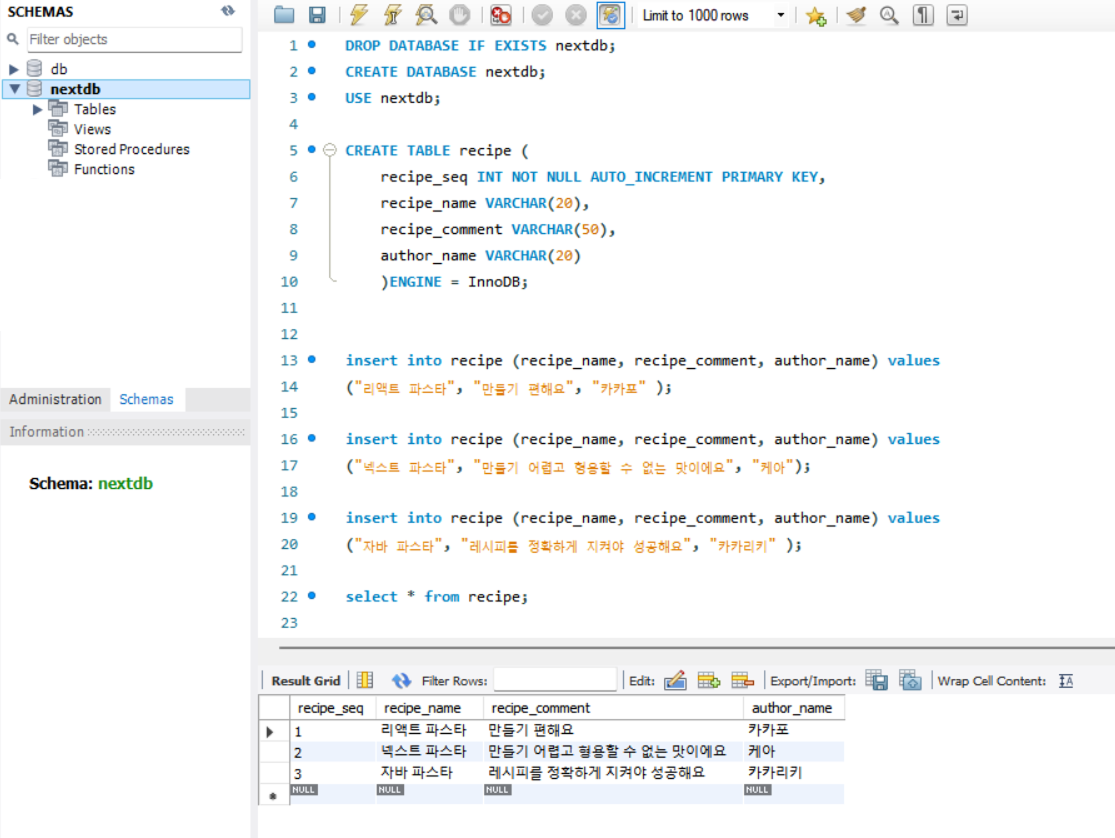
테스트용 DB를 생성해보았습니다.
바로 시작하겠습니다!
Next.js 프로젝트와 MySQL 연결하기
npm install mysql2
터미널에 위 코드를 입력해서 해당 라이브러리를 설치합니다.
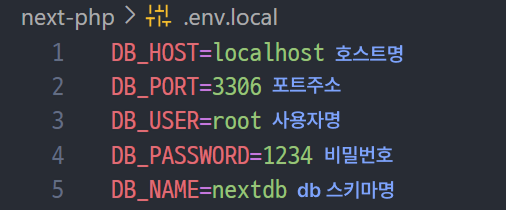
그리고 db에 접근하기 위한 접속 정보는 환경변수로 관리하겠습니다.
.env.local 파일을 생성해 프로젝트 루트 폴더에 넣어줍니다.
그리고 다음과 같이 환경변수들을 작성합니다.
데이터베이스의 호스트명, 포트 주소, 사용자명, 비밀번호, db 스키마명을 저장해 놓습니다.
그리고 CreateConnection.js 파일을 생성하고 다음과 같은 내용을 작성합니다.
import mysql from "mysql2/promise";

async function createConnection() {
  return await mysql.createConnection({
    host: process.env.DB_HOST,
    port: process.env.DB_PORT,
    user: process.env.DB_USER,
    password: process.env.DB_PASSWORD,
    database: process.env.DB_NAME,
  });
}
CreateConnection.js는 MySQL 데이터베이스와의 연결을 처리하는 모듈로 mysql2/promise 라이브러리를 사용하여
비동기적으로 MySQL 연결을 생성하는 역할을 합니다.
MySQL에서 데이터 Server Actions로 가져오기
그리고 데이터를 Server Actions로 가져오는 코드를 작성해 보죠. (기존의 GET 요청처럼)
import createConnection from "./CreateConnection.js";

export default async function RecipeList() {
  const connection = await createConnection();
  let recipes = [];

  try {
    const [rows] = await connection.execute("SELECT * FROM recipe");
    recipes = rows;
  } catch (error) {
    console.error("데이터베이스 조회 오류:", error);
  } finally {
    await connection.end();
  }

  return (
    <div>
      <div>레시피 목록</div>
      {recipes.length === 0 ? (
        <p>등록된 레시피가 없습니다.</p>
      ) : (
        <div>
          <ul>
            {recipes.map((recipe) => (
              <div key={recipe.recipe_seq}>
                <div>
                  {recipe.recipe_name}
                </div>
                <div>
                  {recipe.recipe_comment}
                </div>
                <div>{recipe.author_name}의 레시피</div>
              </div>
            ))}
          </ul>
        </div>
      )}
    </div>
  );
}

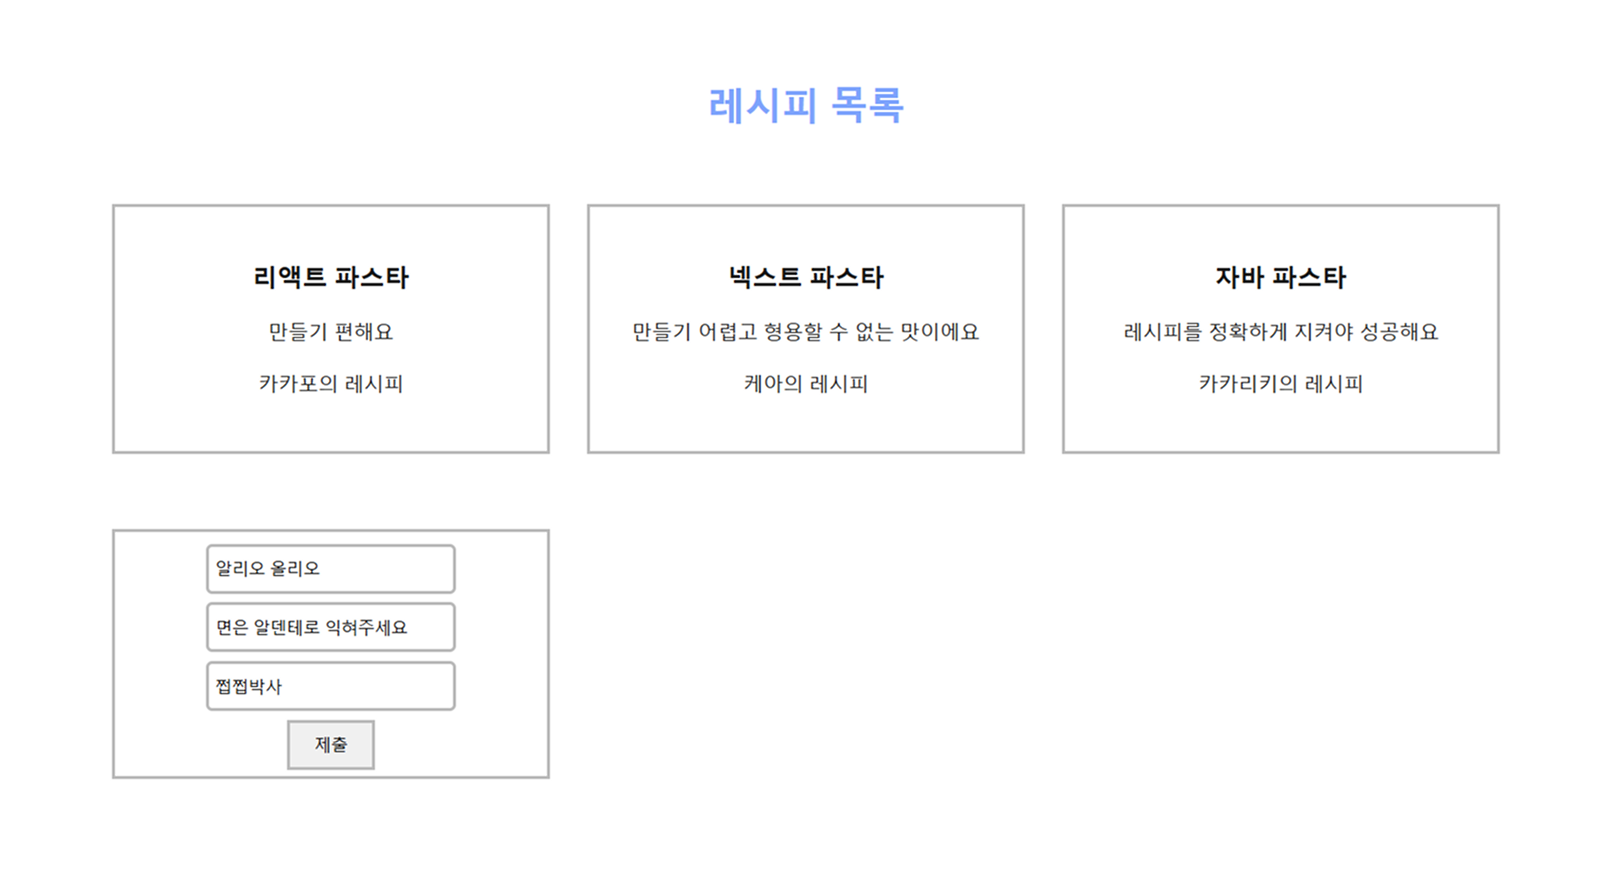
데이터가 정상적으로 불러와졌습니다.
(보기 깔끔하게 약간의 CSS 적용을 했는데 여기 코드에서는 가독성을 위해 CSS className을 삭제했습니다.)
Server Actions을 통해 MySQL로 데이터 전송하기
이제 바로 데이터를 전송하는 함수도 작성해 보겠습니다. (기존의 POST 요청처럼)
async function submitData(formData) {
    "use server";
    const connection = await createConnection();

    try {
      const recipeName = formData.get("recipe_name");
      const recipeComment = formData.get("recipe_comment");
      const authorName = formData.get("author_name");

      await connection.execute(
        "INSERT INTO recipe (recipe_name, recipe_comment, author_name) VALUES (?,?,?)",
        [recipeName, recipeComment, authorName]
      );

    } catch (error) {
      console.error("DB 저장 오류", error);
    } finally {
      await connection.end();
    }
  }
그리고 레시피를 입력할 수 있는 입력 양식 또한 만들겠습니다.
<form action={submitData}>
                <div>
                  <input
                    type="text"
                    placeholder="레시피 이름"
                    id="recipe_name"
                    name="recipe_name"
                  />
                </div>
                <div>
                  <input
                    type="text"
                    placeholder="한 줄 코멘트"
                    id="recipe_comment"
                    name="recipe_comment"
                  />
                </div>
                <div>
                  <input
                    type="text"
                    placeholder="글쓴이"
                    id="author_name"
                    name="author_name"
                  />
                </div>
                <button type="submit">
                  제출
                </button>
              </form>
- 제출 버튼은 button 태그를 사용하셔야 합니다. div 태그는 폼 제출을 처리할 수 있는 폼요소가 아니기 때문에 에러가 발생합니다. HTML에서 submit 버튼을 처리하는 표준 방식은 button 태그이며 button 태그는 type="submit" 속성을 가지고 있을 때 폼을 제출할 수 있는 기능을 제공합니다.
- 반면 div 태그는 기본적으로 인터랙티브한 요소가 아니기 때문에 폼 제출을 자동으로 처리하는 기능은 없습니다. div 태그로 제출 버튼을 만들려면 onClick 이벤트 핸들러를 추가해야 하는데 이는 서버 컴포넌트에서 사용할 수 없으니 결국 button 태그를 사용해야 합니다.
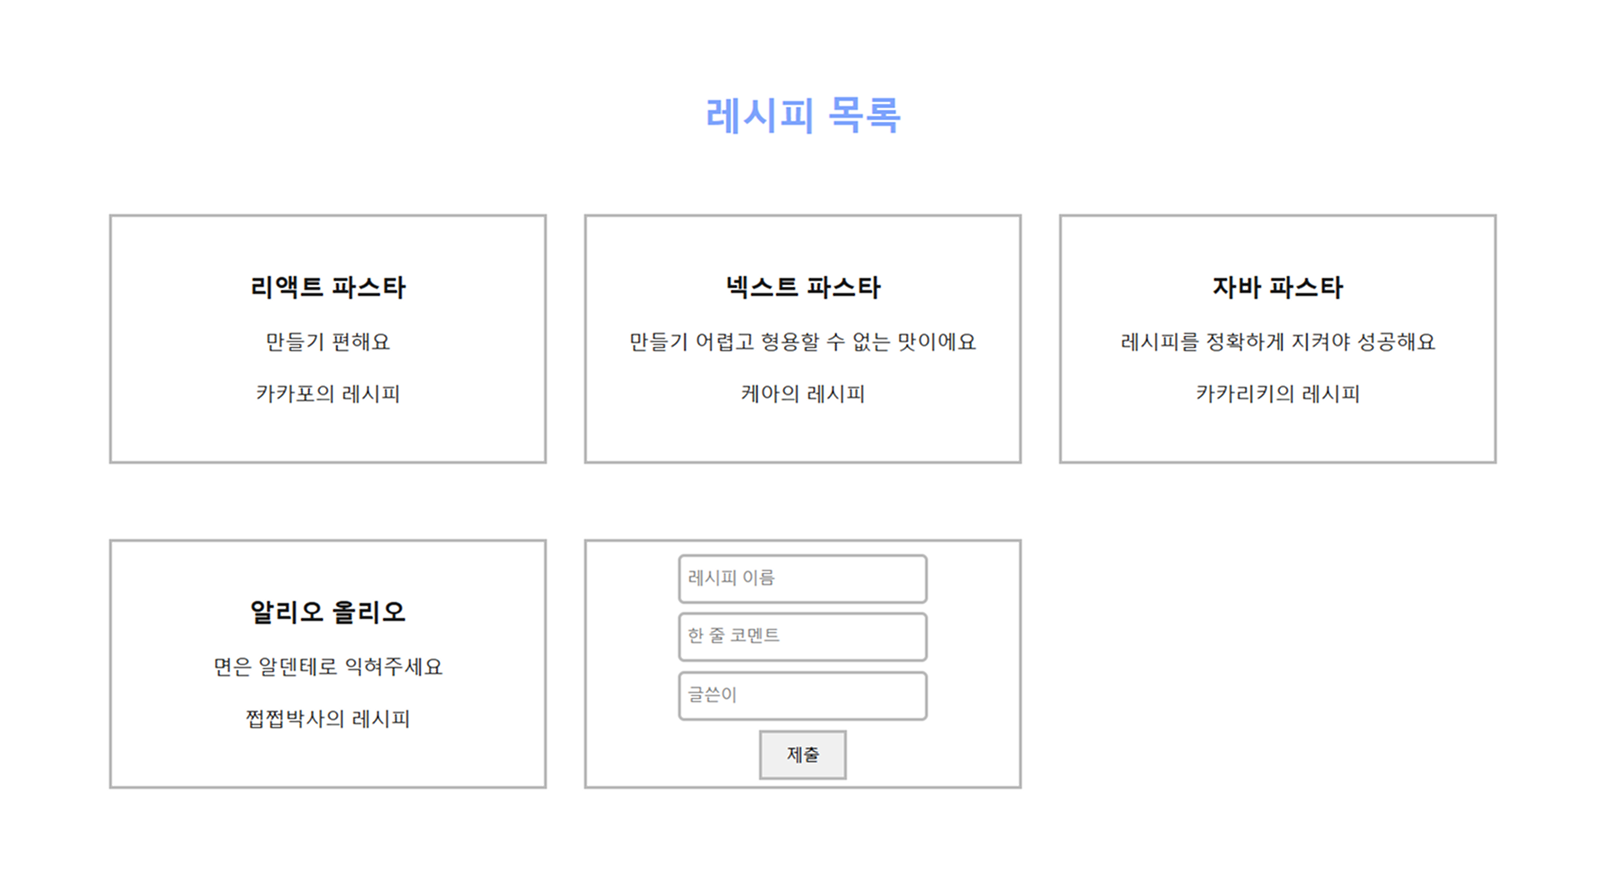
레시피 이름과 한 줄 코멘트 그리고 글쓴이까지 입력하고 제출하면 새로운 레시피가 등록됩니다.
하지만 새로고침을 해야 새로 등록된 레시피가 화면에 업데이트됩니다.
Next.js가 제공하는 Caching and Revalidation 기능으로 곧바로 해결해 보겠습니다.
Server Actions과 함께 caching and Revalidation 기능 활용하기
Server Actions integrate with the Next.js caching and revalidation architecture. When an action is invoked, Next.js can return both the updated UI and new data in a single server roundtrip. (서버 액션은 Next.js의 캐싱 및 재검증 아키텍처와 통합됩니다. 서버 액션이 호출되면 Next.js는 단일 서버 왕복으로 업데이트된 UI와 새 데이터를 모두 반환할 수 있습니다. )
공식 문서에서도 이러한 내용이 나오네요.
데이터 캐싱 재검증 코드를 추가하겠습니다.
import { revalidatePath } from "next/cache";
revalidatePath를 import 해주고
submitData 함수에도 코드를 한 줄 추가해 줍니다.
async function submitData(formData) {
      "use server";
      const connection = await createConnection();

      try {
        const recipeName = formData.get("recipe_name");
        const recipeComment = formData.get("recipe_comment");
        const authorName = formData.get("author_name");

        await connection.execute(
          "INSERT INTO recipe (recipe_name, recipe_comment, author_name) VALUES (?,?,?)",
          [recipeName, recipeComment, authorName]
        );

        revalidatePath("/recipe");         <ㅡㅡㅡㅡㅡ ★이 부분 추가★
      } catch (error) {
        console.error("DB 저장 오류", error);
      } finally {
        await connection.end();
      }
    }
revalidatePath("/recipe"); 를 함수 안에 추가해 줍니다. 그러면 수동 새로고침 없이도 데이터가 업데이트된 상태로 렌더링 됩니다. (revalidatePath("/")는 "/"로 지정된 경로와 그 하위 경로에 대한 캐시를 무효화하며 데이터 변경 사항이 즉시 반영되도록 합니다. 저는 테스트 페이지의 재갱신만 필요해서 해당하는 페이지의 경로를 적었습니다.)
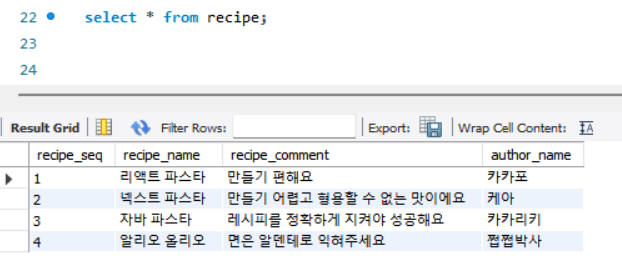
db에서 다시 레시피 테이블을 조회하면 잘 입력된 것을 알 수 있습니다.
페이지의 전체 코드는 다음과 같습니다.
(CreateConnction.js 파일의 코드는 본문 내용 중 윗부분에 있습니다.)
page.jsx
import { revalidatePath } from "next/cache";

import createConnection from "./CreateConnection.js";

export default async function RecipeList() {
  const connection = await createConnection();
  let recipes = [];

  try {
    const [rows] = await connection.execute("SELECT * FROM recipe");
    recipes = rows;
  } catch (error) {
    console.error("데이터베이스 조회 오류:", error);
  } finally {
    await connection.end();
  }

  async function submitData(formData) {
    "use server";
    const connection = await createConnection();

    try {
      const recipeName = formData.get("recipe_name");
      const recipeComment = formData.get("recipe_comment");
      const authorName = formData.get("author_name");

      await connection.execute(
        "INSERT INTO recipe (recipe_name, recipe_comment, author_name) VALUES (?,?,?)",
        [recipeName, recipeComment, authorName]
      );

      revalidatePath("/");
    } catch (error) {
      console.error("DB 저장 오류", error);
    } finally {
      await connection.end();
    }
  }

  return (
    <div>
      <div>레시피 목록</div>
      {recipes.length === 0 ? (
        <p>등록된 레시피가 없습니다.</p>
      ) : (
        <div>
          <ul>
            {recipes.map((recipe) => (
              <div key={recipe.recipe_seq}>
                <div}>
                  {recipe.recipe_name}
                </div>
                <div>
                  {recipe.recipe_comment}
                </div>
                <div>{recipe.author_name}의 레시피</div>
              </div>
            ))}
            <div>
              <form action={submitData}>
                <div>
                  <input
                    type="text"
                    placeholder="레시피 이름"
                    id="recipe_name"
                    name="recipe_name"
                  />
                </div>
                <div>
                  <input
                    type="text"
                    placeholder="한 줄 코멘트"
                    id="recipe_comment"
                    name="recipe_comment"
                  />
                </div>
                <div>
                  <input
                    type="text"
                    placeholder="글쓴이"
                    id="author_name"
                    name="author_name"
                  />
                </div>
                <button type="submit">
                  제출
                </button>
              </form>
            </div>
          </ul>
        </div>
      )}
    </div>
  );
}
리팩토링을 통해 코드를 더 간결화할 수 있겠으나 오늘은 여기까지 해야겠습니다..
"use server" 지시문에 관한 궁금증
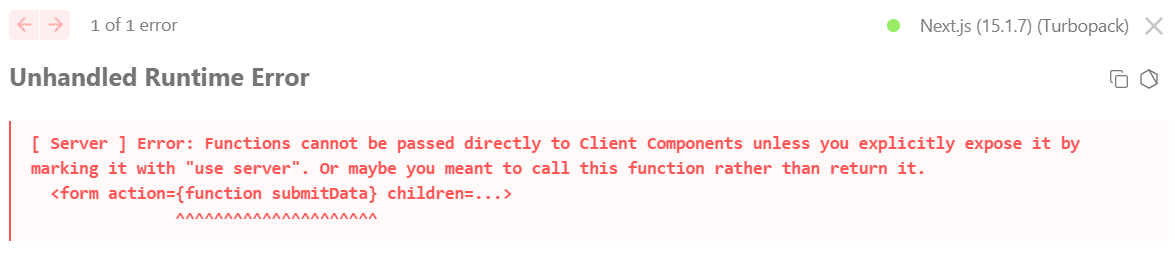
일단 이 예제는 서버 컴포넌트에서 데이터를 가져오고 보내는 예제입니다. 그런데 데이터를 가져오는 기능에는 "use server" 지시문이 없어도 잘 동작했고, 데이터를 전송하는 함수에는 "use server" 지시문이 있어야 했습니다. 데이터를 전송하는 함수에서는 "use server" 지시문이 없으면 바로 다음과 같은 에러가 발생합니다.
이는 서버컴포넌트에서 읽기 작업(SELECT 쿼리)은 서버 컴포넌트 내에서 자동적으로 서버에서 실행되는 반면 쓰기 작업(INSERT, UPDATE 쿼리)은 클라이언트 상호작용(폼 제출 등)에 응답하는 것이기 때문에 "use server" 지시문이 필요하기 때문이라고 합니다.
Server Actions의 장점
- API 엔드포인트 없이 서버에서 직접 데이터 처리가 가능하므로 코드가 간결해집니다.
- (제 처음 생각과는 반대로) 보안상의 이점이 있습니다.
- 자동 캐싱 및 Revalidation 기능 제공하므로 성능 최적화에 도움을 줍니다.
- 불필요한 클라이언트 사이드 코드 감소가 감소하므로 페이지 로드 속도가 향상됩니다.
- HTML 폼과 자연스럽게 통합되므로 상태 관리가 간소화됩니다. (원래는 useState, onSubmit 핸들러 등으로 복잡한 상태 관리가 필요했었는데 이제는 코드가 간결해지고 유지보수가 쉬워집니다.)
보안 측면에서의 Server Actions
Next.js 프로젝트 코드에 직접 sql 쿼리문을 작성하는 것에 있어서 보안상의 문제를 우려하는 의견도 있지만 오히려 Server Actions는 보안상의 장점이 있다고 합니다. 왜냐면 클라이언트 코드에 SQL이 노출되지 않고 서버에서만 실행되기 때문입니다. 모든 데이터 처리가 서버에서 이루어집니다.
Server Actions 기능의 활용처
- 단순한 데이터 삽입/수정/삭제 작업(CRUD)
- 페이지 내에서 데이터 갱신이 즉시 필요한 경우 (revalidatePath 활용)
- 클라이언트에서 직접 API 요청 없이 서버에서 처리하고 싶은 경우
이외에도 간단한 폼 제출 처리, 빠른 프로토타이핑 등과 같은 곳에 유용하다고 합니다.
하지만 서버에서 복잡한 비즈니스 로직을 처리해야 하는 경우에는 적합하지 않다고 하네요.
결국 빠르게 구현되어야 하며 단순한 로직을 사용하는 CRUD 관련 작업에 주로 사용될 것 같습니다.
오늘 제가 이 기능을 구현해 본 건 오로지 호기심에서였습니다.
사실 이러한 기능(API 엔드포인트 구축 없이 곧바로 프론트엔드 프로젝트에서 데이터베이스에 접근하는 것)은
비슷한 기능을 제공하는 다른 언어를 사용해 본 적 없는 제 입장에서는 매우 생소한 것이었습니다.
하지만 실제 진행하는 프로젝트에서는 이 기능을 어떤 방향으로 활용할 수 있을지는 아직은 잘 모르겠네요.
글을 마치며
지금까지 Server Actions를 활용한 서버 컴포넌트에서의 Next.js 프로젝트와 MySQL 간의 데이터 연동을 구현해 보았습니다. 사실 예전에 우연히 알게 된 기능인데 그 당시 프로젝트에서는 적용되지 않았고 그때도 제 호기심으로 따로 짧게 구현만 해본 경험이 있습니다. 그때는 데이터를 가져오는 기능(SELECT)만 구현해 봐서 이번에 등록하는 기능(UPDATE)도 같이 구현해 보았습니다.
이 한 가지 기능도 배워야 할 것이 정말 무궁무진하네요. 정말 많은 시간이 걸렸습니다. 역시 Next.js!
만약 제가 잘못 알고 있는 정보가 있다면 피드백을 부탁드리겠습니다.
'FE > Next.js' 카테고리의 다른 글
| [Next.js] App Router에서의 CSS-in-JS 사용과 한계 (0) | 2025.03.11 |
|---|---|
| [Next.js] App Router에서는 어떤 CSS 방식을 사용해야합니까? (0) | 2025.03.06 |
| [Next.js] App Router의 "use client"는 CSR만을 의미하지 않는다. (0) | 2025.03.03 |
| [Next.js] Server Actions란? (0) | 2025.02.26 |
| [Next.js] Next.js 프로젝트 생성하기 (0) | 2025.02.24 |